How to Build a Heavy Duty Dolly: Complete Build Guide
Building a heavy-duty dolly might seem complex, but with the right materials and proper planning, it’s entirely doable.
You’ll need robust steel tubing, a clear sense of weight limits, and precise placement of parts to ensure stability and safety.
By the end, you’ll be able to assemble a sturdy, reliable dolly capable of handling heavy loads.
Dive into the full details to get started on creating your own tough, dependable tool.
Add a 50% Safety Margin to Your Tongue Weight Capacity
Adding a 50% safety margin to your tongue weight capacity is essential because real-world loads are unpredictable. Cargo shifts, bumps, braking, and sudden stops increase the forces acting on your hitch. To account for these variables, multiply your expected tongue weight by 1.5. For example, if your trailer is designed to carry 400 pounds on the tongue, plan for at least 600 pounds to ensure safety. Always round up to the nearest whole number. This buffered figure becomes your safety margin, not your working load. If you need a tool to assist with moving heavy items, reviewing top furniture dollies can help you choose a reliable dolly for your tasks. Choosing high-quality components like ratchet straps helps secure loads and maintain stability during transport. When comparing equipment options, consider whether a hand truck or a dolly offers the best balance of maneuverability and weight capacity for your specific hauling needs.
Building your hitch components around this higher capacity keeps your trailer stable and prevents sway caused by too little tongue weight. Overloading can strain your hitch and steering, risking damage or failure. Aim for a tongue weight that is about 10 to 15 percent of your trailer’s gross weight. Size all parts—couplers, fasteners, frame joints—to handle this conservative load. Ignoring the safety margin increases the risk of component distortion or fatigue under dynamic conditions. Be sure to measure and verify your final setup with a scale to confirm it meets these safety standards. Conservative sizing isn’t optional; it’s vital for safe towing.
Choose the Right Steel Tubing for a 1,000-Lb Dolly Build
For a 1,000-lb dolly, you should use ASTM A500 square structural tubing. Its higher yield strength, typically between 42 and 50 ksi, provides better resistance to bending and frame twist compared to A36 plate steel, which has a yield strength of around 36 ksi. Square tubing also offers superior torsional stiffness, helping keep the frame rigid on uneven surfaces. The wall thickness plays a key role in overall stiffness; selecting walls between 0.125 inches and 0.25 inches is common for heavy-duty builds. Additionally, applying a steel finish is essential because uncoated tubing is prone to rust. Priming and painting or choosing galvanized steel enhances durability, especially for outdoor use. During welding, precise tube alignment is vital—misaligned or weak joints can cause the dolly to track crooked. Always verify that your mill’s specifications match your steel grade requirements; stronger steel won’t compensate for poor fabrication quality. Completing a final safety check before first use ensures all welded joints and fasteners are secure, preventing load shifts during operation.
Measure Trailer Hitch Height and Mark Axle Position Before Cutting
To accurately mark your axle position before cutting, start by measuring your trailer’s deck length. Apply the 60/40 rule: place the axle center at 60% of the deck length from the front. Use a straight line along the frame as a reference point, then mark the axle centerline from that line. Measure from the same side each time to ensure consistency and reduce error. Confirm that the left and right sides have equal spacing to keep the axle square. This approach aligns with static equilibrium principles, ensuring that the sum of forces and torques from the hitch, axle, and load equals zero for stable towing. When selecting your trailer components, consider the collapsible folding wagon design for improved portability. Before cutting, double-check all measurements and markings. Make sure your trailer’s frame and the positioning follow the planned layout, as precise placement affects towing stability and ride quality. A properly installed tow hitch provides the necessary structural connection and load distribution for safe towing. For added confidence, verify that the hitch receiver you plan to use matches your trailer’s weight capacity to avoid overloading the system. Taking these steps ensures proper alignment and helps prevent issues down the road.
Match Wheel Load Rating and Type to Your Floor Surface
Use wheels with diameters of 5 inches or more to effectively roll over cracks and debris without causing chatter. Larger diameters help absorb shocks and improve maneuverability on uneven surfaces. A wider tread distributes the load more evenly, reducing point pressure on soft floors and preventing damage. Keep in mind that dynamic rolling loads can drop to 60-75% of the static capacity, so always choose wheels with extra capacity to ensure durability and a longer service life. For heavy loads, consider integrating a purpose-built tow hitch ski rack to simplify transporting gear safely. Attaching the wheels securely to the dolly frame requires a Burley bike trailer style hitch mechanism to ensure stable coupling during movement. For lighter loads, you can consider a model with a front basket to carry tools conveniently.
Drill Holes Carefully to Stop Binding and Frame Stress
Drilling holes carefully is essential to prevent binding and avoid stressing the frame. Start with pilot holes; these keep your final drill centered and reduce side loading that can cause misalignment. Match your final hole diameter closely to the fastener, allowing just enough clearance—too tight and fitting becomes difficult; too loose and the joint weakens.
Proper holes placement makes a big difference. Keep spacing consistent to ensure load sharing, and avoid clustering openings, as closely spaced holes can tear apart under tension. Maintain at least three times the material thickness from bend lines and edges to prevent stress risers. Always burr the edges after drilling to eliminate sharp spots that could initiate cracks or snag moving parts. Just as with attaching a bike trailer, it is vital to check that all fasteners are properly torqued to prevent loosening during use.
Use a drill press to achieve accurate vertical alignment, and keep drill speeds moderate to prevent overheating. Clean, precise holes distribute force evenly across the frame, helping it stay solid under heavy loads and extending its lifespan. For sandy terrain, consider adding larger wheels to reduce ground pressure and improve rolling performance over soft surfaces. This approach mirrors the no-weld philosophy of joining parts with bolts and brackets, which keeps the structure modular and easier to repair.
Weld or Bolt: Which Assembly Method Works Best for You?
Welding is the better choice if you require a rigid, permanent structure that maximizes strength. Welded connections create a continuous force path, making your frame behave as a single piece. Proper full-penetration welds can match or even surpass the strength of the base metal, which is crucial when supporting heavy static loads. However, once welded, the assembly cannot be easily modified or disassembled. Any changes require cutting and rework, making welding suitable only if you are confident the design will not need future adjustments.
Bolting offers greater serviceability, allowing you to disassemble, replace parts, or modify the frame later. Bolted joints use high-strength fasteners that can achieve substantial load capacity, but they also reduce cross-sectional strength around the holes. Bolts provide some flexibility under vibration, as maintaining proper preload helps prevent looseness. If your project might need future adjustments, repairs, or modifications, bolting is the preferable method. It also simplifies on-site field repairs compared to welding. For example, a bicycle carrier bolted to a receiver hitch can be easily removed or swapped between vehicles.
Test Wheel Rotation and Caster Movement Before Loading
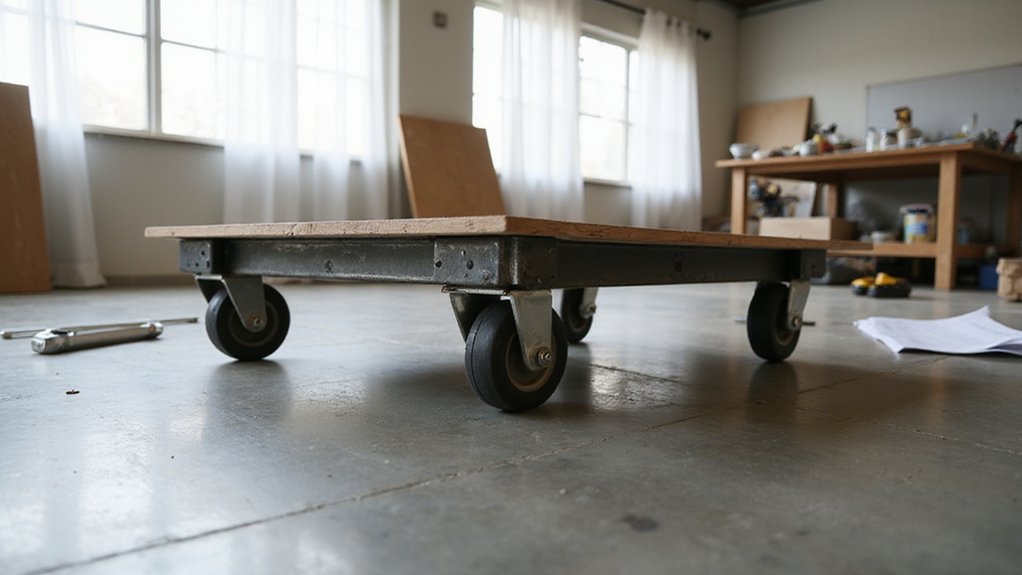
To ensure your dolly is ready for use, you should thoroughly test each wheel and caster before loading. Lift the dolly off the ground and spin each wheel by hand; they should rotate freely without dragging, wobbling, or binding. Swing each swivel caster through its full range of motion to verify a smooth 360-degree turn, looking out for roughness or sticking. Gritty or notchy rotation indicates that bearings may need inspection or lubrication. Consider how a yard cart for lawn mowers is tested to ensure smooth rolling under load. Always check the manufacturer’s guidelines for proper bearing maintenance intervals. Examine the axles and raceways for dirt, debris, or corrosion, and clean them as needed. Apply lubricant to any dry or squeaking areas on the casters, especially at the swivel points and axle zones. Clean out debris from wheel hubs and swivel bearings before applying grease or lubricant. If a wheel is damaged or bent, do not force or realign it; instead, replace the worn or broken component. To avoid fitment mistakes, always verify the load capacity and wheel diameter against the dolly’s intended use. Test the brakes and locking mechanisms by engaging and releasing each one, ensuring they hold securely and release smoothly. A secure brake is critical when positioning the dolly on inclines during loading. Finally, roll the unloaded dolly across a flat surface to check if it tracks straight and moves easily without resistance. Only load the dolly after confirming all these checks have been successful, ensuring safe and smooth operation.
Check Your Dolly’s Stability Under a Full Load
Ensure the line of action stays within the stability triangle during full-load testing. Observe for wheel lift, noticeable lean, or a loss of contact at any corner. A stable dolly maintains its center of gravity centered and as low as possible. To further secure the load, use a secure hitch pin to lock the dolly’s towing connection firmly. If you detect any signs of instability, immediately rearrange the load to improve balance. It’s recommended to proof-test at 125 percent of the rated load for critical applications. For particularly demanding tasks, compare your build’s performance to heavy duty utility carts reviewed in top comparisons to ensure your dolly meets industry standards for tough tasks. Never proceed with the load until the dolly feels firm and balanced from all angles. For added security, consider pairing your build with the best strap for dolly reviewed in our top-rated guide to keep heavy loads firmly secured.
Common Mistakes That Ruin a Heavy-Duty Dolly Build
Make sure to select the right wheels for your heavy-duty dolly. Small wheels might seem like a good idea for maneuverability, but they concentrate weight on a small surface area. This can cause damage to floors over time and increase wear on the wheels themselves. Opt for larger, durable wheels made from non-marking materials such as rubber or polyurethane. These distribute the load more evenly, reducing floor damage and providing smoother, easier rolling under heavy loads. Proper wheel choice not only protects your surfaces but also extends the lifespan of your dolly, ensuring safer and more efficient handling of heavy items.
Final Inspection Checklist for Your 1,000-Lb Dolly
Start the final inspection of your 1,000-lb dolly by visually checking the entire frame for any cracks, bends, or corrosion. Inspect all welds and hardware closely, ensuring there are no loose or damaged components. Test each wheel and caster to verify they roll smoothly without wobbling. Confirm that your brakes lock securely and release properly when needed. Examine the paint surface for chips or scratches, since chipped paint can expose metal and promote rust over time. Make sure the load capacity of the dolly matches the weight of your intended load, and keep the load centered to prevent imbalance. Perform a short roll test by pushing the dolly with a typical load, then recheck fasteners afterward to confirm they remain tight. Check that all warning labels are clean, legible, and securely attached. Lastly, verify your dolly complies with any applicable certifications or safety standards required in your workspace. Only after correcting any identified issues should you return the dolly to service.