DIY Fishing Cart: Build a Rod & Tackle Hauler
Struggling to transport your fishing gear over sandy terrain without a fancy trailer? A DIY floating cart built from scrap PVC and balloon tires can make life easier and cost very little.
With a few simple steps, you can create a lightweight, durable hauler that keeps your rods secure and easily maneuvers over the shoreline.
By building your own cart, you control the size, weight capacity, and features, ensuring it fits your needs perfectly.
Keep reading to see how you can put this practical project together step by step.
Why a Dirt-Cheap Cart Beats an Expensive Wagon on Sand
A dirt-cheap cart outperforms an expensive wagon on sand thanks to wheel design. Wide, low-pressure tires—about 13 by 7 inches at 3 PSI—float over sand rather than sink in. Narrow wheels dig in and slow you down. You don’t need a costly wagon; a simple DIY cart with these balloon tires will roll easier and require less effort. Repurposing an old frame and investing in fat tires gives you better flotation without extra weight or fragile parts. For a truly lightweight and durable build, consider choosing a frame with collapsible folding capability for easy transportation. Skipping fancy features reduces corrosion and keeps the cart lightweight. For example, an expensive wagon’s steel frame often adds weight without improving sand performance, whereas a DIY cart with wide tires floats effortlessly. To ensure your cart’s load stays secure during transport, you should also use reliable cam straps for kayak security. To ensure your DIY cart handles like a top performer, study the features of top cargo carriers designed for hitch use to understand optimal tire and frame design. Overall, this approach offers better performance and value than buying an expensive, poorly-optimized wagon.
Fishing Cart Budget: $585 New vs. Free Repurpose
A repurposed fishing cart can cost you nearly nothing, especially if you leverage items you already own or find for free. Building one from scrap materials like an old wagon or stroller frame drastically cuts costs—often down to zero. For example, using scrap PVC pipes for rod holders and recycled wheels can bring your total investment to just a few dollars or less. To efficiently source sturdy wheels for your build, you can learn how to remove casters from an old office chair and attach them to your frame. You can similarly build a simple alternative from a garage sale cooler that avoids the need for welding or buying specialized carts. For those considering a truck-based build, a bike rack for truck box can also be adapted to hold fishing rods and tackle securely. To ensure your repurposed base moves smoothly, consider reinforcing the frame with furniture dollies that are often found cheaply at thrift stores.
The main expense in a new build comes from wheels, with balloon wheels alone reaching around 150 dollars. These wheels make the cart more stable and easier to move over uneven terrain but are costly. Repurposing allows you to avoid that expense entirely, since you can reuse existing wheels or find free alternatives.
Pick Your Base: PVC, Aluminum, or an Old Stroller
PVC is the lightest option, making it ideal for reducing push effort on soft surfaces like sand. However, it is less durable and prone to damage when exposed to sun or cold, which can lead to cracking or warping over time. Its lower weight capacity means it’s best suited for carrying light loads rather than heavy gear or repeated use. For securing heavier loads during transport, consider using ratchet straps for trucks to keep your gear stable. PVC builds cost less and come together quickly, but they may need replacement sooner if used intensively outdoors. To ensure longevity, you can remove and repair caster wheels effectively when they wear out. For heavier loads, consider using an old stroller base instead, as a furniture dolly can handle significant weight with proper parts and assembly.
5 Frame Criteria: Weight, Axle Points, Deck, and Clearance
The five critical frame criteria are weight, axle points, deck size, clearance, and stability. These factors determine your cart’s overall performance and safety. Keep the weight of your cart below 25 percent of its load capacity to reduce effort, especially on soft sand where less resistance makes a significant difference. For example, top garden carts reviewed for easy shopping demonstrate how balanced frame design improves maneuverability on similar terrain. A well-designed caster provides smooth rotation by allowing the wheel to swivel freely under load. Selecting a cart with reliable cargo strap reviews can further help secure your gear during transport.
Axle points should sit between the front vertical supports and the bottom crossbar, centered side-to-side. This placement ensures balanced load distribution and smooth rotation under load conditions. Adequate clearance—at least six inches from ground to bottom of the frame—is necessary to clear ridges and shells, but avoid excessive height. Too much clearance raises the center of gravity and can compromise stability.
For the deck, a size of about 24 by 16 inches works well for most coolers, spreading the load evenly to reduce stress on joints. This combination supports joint strength and prolongs the lifespan of your cart’s frame.
Ultimately, good material durability alone cannot compensate for poor balance. Achieving the right combination of weight, axle positioning, deck size, and clearance results in a stable, easy-to-maneuver cart suitable for challenging terrains.
PVC Layout That Protects Rods and Tackle
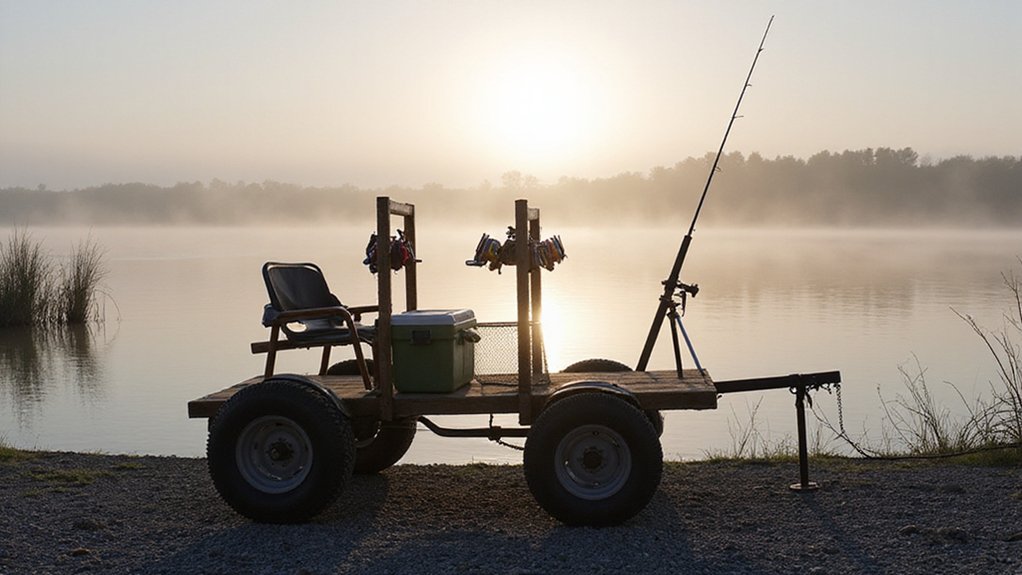
The PVC layout that protects your rods and tackle features an open-top cage built with upward-facing PVC ports, ensuring your gear stays secure during transport. The main frame uses Schedule 40 PVC pipe, sized from 1 inch to 1-1/4 inch, providing strength and stability. Smaller tubing forms the vertical rod ports, keeping your rods upright and separate from other gear. The open design allows quick access to everything without unloading, while the squared alignment prevents twisting for a stable load. This setup also creates a snag-free zone, reducing the risk of gear catching or crushing during transit. Before loading, always confirm the cart is on a level surface and that all joints are firmly seated, a step similar to the safe mounting checks used for truck bed accessories. Central space is kept clear for tackle boxes, a cooler, and bait, with a drop-in tray for small lures and hooks—helping you stay organized and ready to fish. A proper load rating ensures the cart’s frame and wheels can safely support the combined weight of your gear without tipping. The cart includes a snap-on shade cover for additional protection during long days on the water. For added security when moving the loaded cart, using top moving straps can help keep the frame and gear from shifting during transport.
Rod Holders That Won’t Tumble on Loose Sand
Using a wide, low-profile base of at least 8 inches in diameter helps prevent tipping on loose sand. This distributes the weight of your gear over a larger area, making your rod holder more stable. Tripod-style or twin-leg sand spikes provide additional stability by offering multiple contact points instead of just one stake. Cross-braced designs further improve stability by resisting rotation from wind or movement. For maximum holding power on soft ground, consider beach cart wheels that are at least 10 inches wide to prevent sinking. Many anglers find that a top trailer hitch basket offers a convenient way to transport gear across soft terrain without manual carrying. You can further enhance transport by building a DIY kayak cart from a milk crate to haul rods and tackle across sand.
Depth is just as important as the base size for stability. Bury your sand spike at least 12 inches into soft sand, but going 18 to 24 inches deep offers more holding power. After insertion, compact the sand around the base to eliminate gaps that could cause wobbling. Ensure your rod butt fits snugly in the holder to prevent unnecessary movement. Performing a quick side-rock test after setup can indicate whether your holder is secure enough to withstand activity or wind.
Wheels and Axle for Smooth Floating Over Soft Sand
To effectively float your gear over soft sand, use balloon wheels with a large diameter—12 to 13 inches for lighter loads, or 16 inches if you carry heavier weight. Wider tires, around 7 to 8 inches across, provide better flotation and help prevent sinking. Keep tire pressure between 2 and 4 PSI; overinflating reduces floatation and hampers soft-sand performance. The Bonnlo 16″ set includes a hand pump for easy inflation, ensuring correct low pressure is achieved. For those mounting heavy loads, consider an aluminum cargo carrier design that integrates a hitch-mounted platform to distribute weight evenly. For guidance on securing heavy gear, reviewing a top bed extenders comparison can help identify useful stabilizing accessories.
Match your axle diameter to your hub size—common options include 20 mm, 22 mm, or 1 inch. Always opt for extra axle length to accommodate spacers and locking hardware. Use stainless steel or aluminum axles to resist salt-air corrosion in marine environments. Installing bearings in the hub ensures smooth rolling under load, reducing effort and preventing wheel seizing. Properly selecting these specifications will help your cart glide effortlessly without plowing or sinking.
Assemble: Dry-Fit, Glue, Then Test Your Load
Before applying glue, always dry-fit the entire assembly first. This step confirms that parts align correctly and the sequence of assembly works smoothly, allowing you to fix misaligned joints or gaps early on. Dry-fitting helps you identify and resolve issues before adhesive bonds the pieces permanently.
During the dry run, clamp parts with realistic pressure so that your holding technique mirrors final conditions. Mark reference points and record clamp positions to ensure consistent results when you proceed to gluing.
Plan staged glue-ups instead of assembling everything at once. Working in subassemblies makes it easier to manage complex parts and reduces the risk of misalignment. Before gluing, scrape off splinters, sand rough edges, and verify that hinges or moving parts pivot freely without obstruction.
Apply adhesive carefully after confirming the fit, then clamp and wait. Most PVA glues need 30 to 60 minutes before you can release the clamps. Avoid rushing this process, as proper curing is critical for strength. Once set, test the assembly gently with a tap or light shear to check for bond integrity.
Gradually load your project, applying increasing weight to assess stability. Flex it lightly to spot potential weaknesses. Only trust the assembly after it performs reliably under these test conditions, ensuring your finished piece can handle its intended load.